
Pixel Implementation QA with Google Speadsheets
Aug 8, 2016 | 7 min readWe all know pixel implementations range from being simple such as putting an image tag on a page to a complex function that dynamically takes apart your order and creates individual pixels for each of the items in your cart. Whether you are just a simple pixel pusher or an actual developer who works with tag management systems, you might find this tutorial helpful.
Google Tag Manager is a great system to help create pixels because it allows for data to be easily appended onto the pixel. Any data that is in the dataLayer or picked up with a CSS selector can be attached to the pixel.
When verifying if a pixel is working while looking in Preview mode, we are able to see what variables are attached to that pixel. In this controlled environment, we know what data is supposed to be there. But we all know that when users are on your website, that dataLayer and the CSS selector somehow picks up data we don’t want it too. This was one of the issues when I was QAing my pixel implementation, I was unaware of what data was actually being sent to the vendors. One method I knew would help would be to look at the data logs of the pixel from the vendor but getting those would prove to be difficult, so I needed another method to know what data I was sending to the vendors.
After a little bit of research, I remembered that you are able to push data to Google Spreadsheet with Google Tag Manager. Using a tutorial, I adapted Margarita Evtimova’s method which is an adaptation of Martin Hawksey’s AJAX to Google Spreadsheets program.
I wanted to create a small database of the pixels that fire on my website, so I would have those data logs to analyse and understand if the pixel was working as expected. This database will be a reflection of the data that is sent to the vendor.
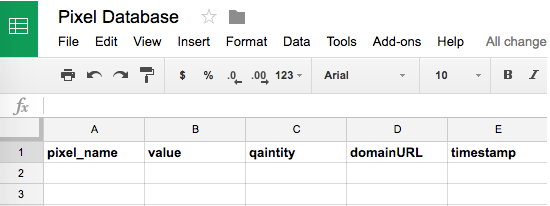
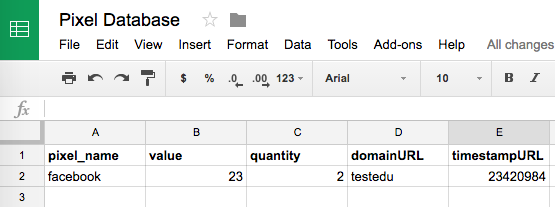
To get started you will have to create a blank spreadsheet in Google Spreadsheets and then add in the column names of the data you would like to collect.
From there we will need to add the code that Margarita Evtimova adapted from Martin Hawksey to the Script Editor. Click Tools…Script Editor. You will see something like this.
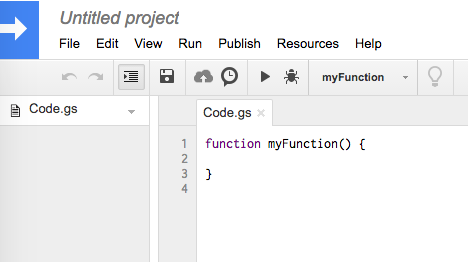
Replace the blank code with the code below.
// Usage
// 1. Enter sheet name where data is to be written below
// 1. Enter sheet name and key where data is to be written below
var SHEET_NAME = "Sheet1";
var SHEET_KEY = "insert-sheet-ID-here";
// 2. Run > setup
//
// 3. Publish > Deploy as web app
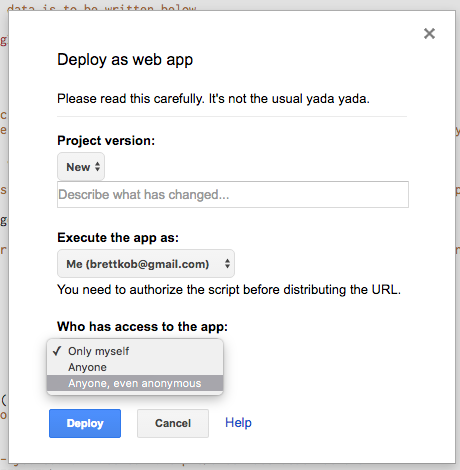
// - enter Project Version name and click 'Save New Version'
// - set security level and enable service (most likely execute as 'me' and access 'anyone, even anonymously)
//
// 4. Copy the 'Current web app URL' and post this in your form/script action
//
// 5. Insert column names on your destination sheet matching the parameter names of the data you are passing in (exactly matching case)
var SCRIPT_PROP = PropertiesService.getScriptProperties(); // new property service
// If you don't want to expose either GET or POST methods you can comment out the appropriate function
function doGet(e){
return handleResponse(e);
}
function doPost(e){
return handleResponse(e);
}
function handleResponse(e) {
var lock = LockService.getPublicLock();
lock.waitLock(30000); // wait 30 seconds before conceding defeat.
try {
// next set where we write the data - you could write to multiple/alternate destinations
var doc = SpreadsheetApp.openById(SHEET_KEY);
var sheet = doc.getSheetByName(SHEET_NAME);
// we'll assume header is in row 1 but you can override with header_row in GET/POST data
var headRow = e.parameter.header_row || 1;
var headers = sheet.getRange(1, 1, 1, sheet.getLastColumn()).getValues()[0];
var nextRow = sheet.getLastRow()+1; // get next row
var row = [];
// loop through the header columns
for (i in headers){
if (headers[i] == "Timestamp"){ // special case if you include a 'Timestamp' column
row.push(new Date());
} else { // else use header name to get data
row.push(e.parameter[headers[i]]);
}
}
// more efficient to set values as [][] array than individually
sheet.getRange(nextRow, 1, 1, row.length).setValues([row]);
// return json success results
return ContentService
.createTextOutput(JSON.stringify({"result":"success", "row": nextRow}))
.setMimeType(ContentService.MimeType.JSON);
} catch(e){
// if error return this
return ContentService
.createTextOutput(JSON.stringify({"result":"error", "error": e}))
.setMimeType(ContentService.MimeType.JSON);
} finally { //release lock
lock.releaseLock();
}
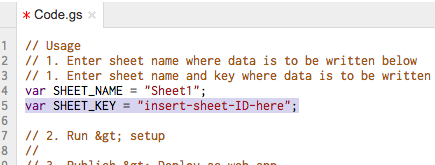
}After that, we will need to replace the “SHEET NAME” and “SHEET KEY” with the correct values. The “SHEET KEY” can be found in the URL of the spreadsheet you created.
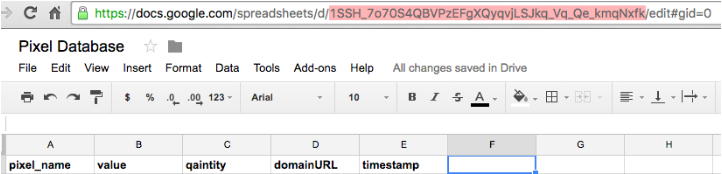
Take that value and place it in-between the quotes.
You can also rename the “SHEET NAME” to whatever you want but make sure to rename it in the spreadsheet too. At this point, you will want to save the script with File…Save and name it whatever you want. In order to start pushing data to this spreadsheet, you will have to Publish it.
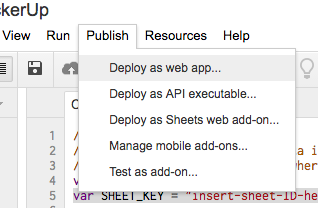
You will need to deploy this as a web app. From here change the “Who can access this app:” to “Anyone, even anonymous”. This will allow for the pixel you created to collect data and push it to the spreadsheet.
After you click Deploy you will be asked to authorize your app and review the permissions. Click Review Permissions, you will need to approve the Authorization. After this, you will be presented with a URL that you will need to grab because this will be the base of your pixel to submit the data.
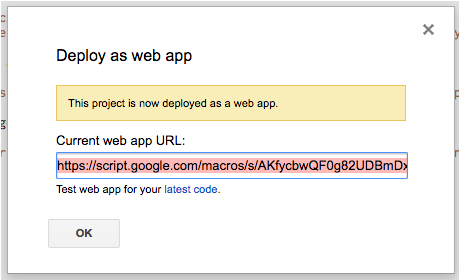
The URL will look something like this:
https://script.google.com/macros/s/AKfycbwQF0g82UDBmDxFauswG5_efTh9vLewMK-LBsfY1uJ8F4yqZzS8/exec From here you will hop into GTM and either create the custom image tag that will fire on the same criteria as the pixel or you will create a custom HTML tag and create the google spreadsheet pixel along side the other pixel. Since Margarita shows how to create one with a Custom Image, I will show how to create one with a Custom HTML tag.
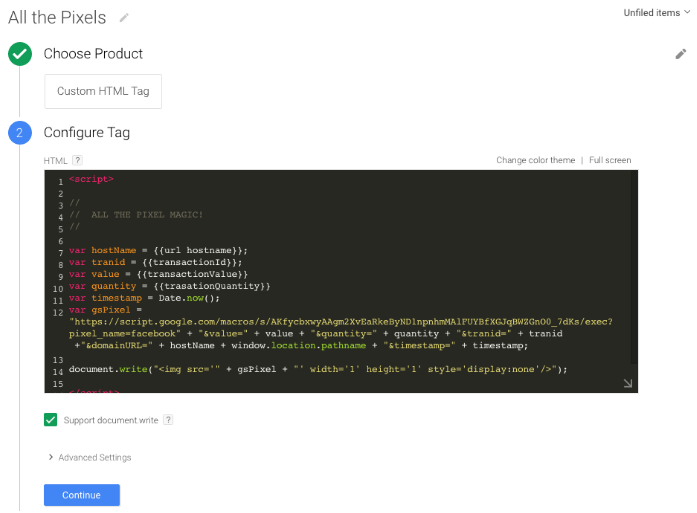
In order for the pixel with the data to be created, you will have to use document.write(). You will notice with the code below that parameters in the URL will match the column names in the spreadsheet.
// ALL THE PIXEL MAGIC! // var hostName = {{url hostname}}; var tranid = {{transactionId}}; var value = {{transactionValue}}; var quantity = {{trasationQuantity}}; var timestamp = Date.now(); var gsPixel = "https://script.google.com/macros/s/AKfycbwQF0g82UDBmDxFauswG5_efTh9vLewMK-LBfY1uJ8F4yqZzS8/exec?pixel_name=facebook" + "&value=" + value + "&quantity=" + quantity + "&tranid=" + tranid + "&domainURL=" + hostName + window.location.pathname + "×tamp=" + timestamp; document.write("<img src='" + gsURL + "' width='1' height='1' style='display:none'/>");
The pixel that is created with this URL will send the data to your spreadsheet. For this example, I have hard coded the pixel_name with “facebook”. This of course can be replaced with any value. If you are going to use this in a for loop you might have to change of the values to reflect the various parts of the Javascript array.
To test if your code in the Google Spreadsheet is working, you can recreate the URL with whatever values you want and then see if it submits to the spreadsheet. Below I have built a test URL, when I put this URL into a new tab it posts the data into the spreadsheet. If it is successful, you will see results: success.
<a href="https://script.google.com/macros/s/AKfycbwQF0g82UDBmDxFauswGsd_efTh9vLewMK-BsfY1uJ8F4yqZzS8/exec?pixel_name=facebook&value=23&quantity=2&tranid=24111521&domainURL=testedu×tampURL=23420984"><span style="font-weight: 400;">https://script.google.com/macros/s/AKfycbwQF0g82UDBmDxFauswG5_efTh9vLewMK-LBfY1uJ8F4yqZzS8/exec?pixel_name=facebook&value=23&quantity=2&tranid=24111521&domainURL=testedu×tampURL=23420984</span></a>
You can set your tag to fire on whatever trigger you want.
For this example, I attached {{hostName}} to the pixel, so I know what domain was firing the pixel off. This can be helpful to determine if a significant amount of pixel conversions are coming from your development or testing sites. In some cases, I have attached a {{transactionId or orderId}} in order to confirm that each of the pixels can be associated with an order.
Do be careful what information you attach to each of these pixels. If it is personal information about the user make sure to have encryption set up. I am still researching ways to do this.
A good way to help you interpret how to build each of the rows, refer to the Network traffic log in your Chrome application. I was under the assumption that there is a lot of content on how to ensure a pixel implementation strategy will work but as I was doing more research, all I noticed was a large amount of individual PDFs with each vendor’s own implementation. I will be writing a separate post on how I QA pixel implementation for individual pixels.
This has also helped to catch when pixels are firing blank data values and determining which page they were firing on. When your entire business is reliant on 1×1 transparent GIF, it nice to have a log of which ones are firing to compare with. Some vendors have a smart enough system that can catch it but I wouldn’t depend on it.
I hope this tutorial helps you come up with some creative ways to continue to track and improve your website performance.